Resetting Mac NVRAM disables Find My Mac

iCloud

Resetting NVRAM (aka zapping PRAM) disables Find My Mac! This is a remarkable flaw in Find My Mac. You must set a firmware password to avoid this flaw.

Find My Mac is a potentially useful way to locate or erase your Mac if it is stolen. But this flaw makes the feature essentially useless if a thief knows about the simple trick.

If you want to use Find My Mac, you must set a firmware password to prevent this flaw from being used. Setting a firmware password prevents zapping PRAM without the password.

See the following Apple Support articles for more information:

Make sure to read the entire Apple Support page about the firmware password so that you understand the changes on the Mac when you set a firmware password.

This flaw makes it clear that the setting for Find My Mac is stored in nonvolatile RAM. It would seem that a simple workaround for Apple to add would be to also store the setting on disk and when the two settings do not match, warn the owner of the Mac that the settings need to be checked.

This flaw continues to exist in Mac OS X El Capitan 10.11.5.


Tip: Don’t forget that WiFi must be turned on for computer to report its location to Find My Mac.

Rebuilding Photos Library Restarts Upload to iCloud

Photos Uploading to iCloud

If you rebuild your Apple Photos library and use the iCloud Photo Library, Photos will upload as if starting from scratch. It appears that the upload is substantially faster so Photos is probably uploading much less that the original upload. In my case (70K+ photos), the upload looks like it will take a couple days vs. the original couple of weeks.

How to fix Apple Photos iCloud Photo Library upload using Network Link Conditioner

The Apple Photos application can cause very slow network performance. This post describes a workaround that can help.

When Apple released Yosemite OS X 10.10.3, they included the new Photos application. Photos replaces both iPhoto and Aperture. A new feature is the ability to upload all your photos to an iCloud Photo Library.

Photos iCloud Preferences

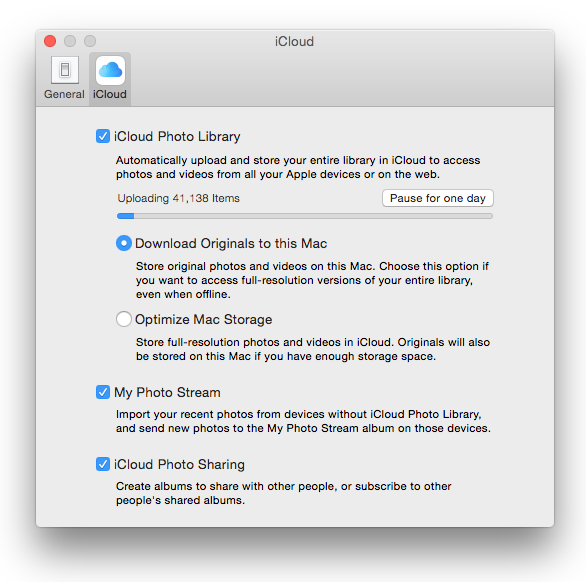
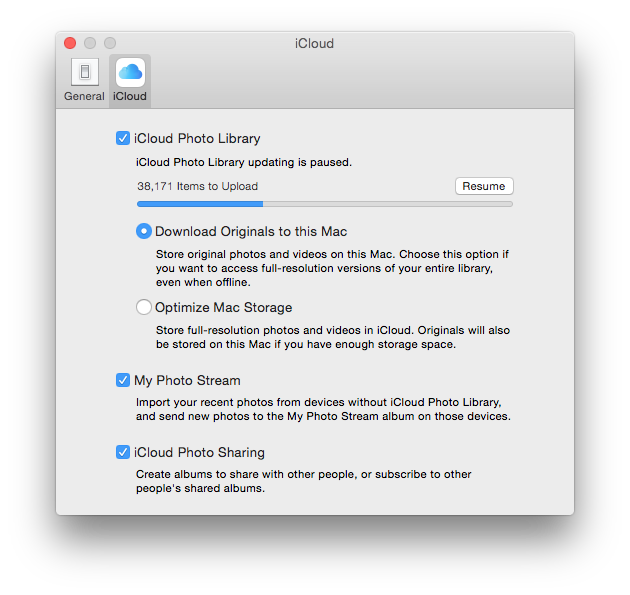
For small photo libraries, the upload probably goes smoothly, but for large libraries, the upload can effectively shut down your internet connection. Apple included a button to “Pause for one day” but that’s not really practical if you have 1,000s of photos to upload.

The following workaround will address the issue for many users until Apple makes a real fix. This fix limits the upload speed from your computer. It appears that some ISPs (mine is Comcast) heavily throttle your connection if your computer is hitting the limit. I’ve been running limited at 80% upload speed for days with no problem.

This fix is easy but a bit geeky. You will use Apple’s Network Link Conditioner system preference panel from the Apple Developer site to limit your network connection speed.

Network Link Conditioner (NLC) is used by application developers to test their apps. It allows them to simulate poor network conditions including slow network speed. It affects all network communication, not just Photos’ iCloud upload.

To set up NLC:

  1. Download the NLC system preference from the Apple Developer’s site. It is part of the Hardware IO Tools.
  2. Install the NLC system preference.
  3. Open the NLC system preference and create a new profile.
  4. Limit the Uplink speed. I tried both 60% and 80% of my available uplink bandwidth and they seemed to work OK.
  5. Set the Downlink limit to something at least close to your ISP’s bandwidth or above.

You’ll probably need to play around with the limits. Remember that it affects all of the network traffic in and out of the computer so something like a Time Capsule backup might go really slowly.

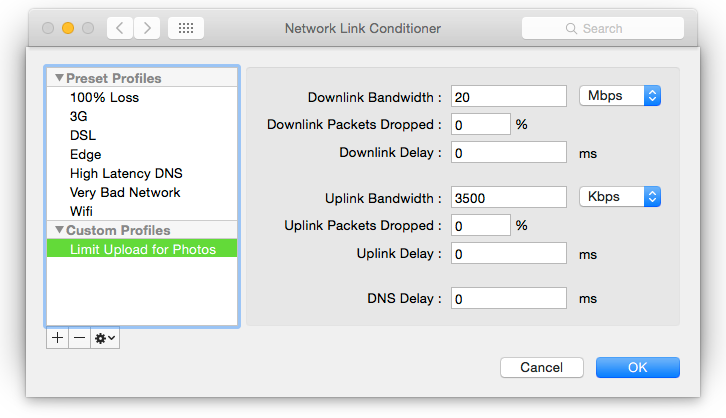
As an example, let’s say your ISP gives you 30Mbps download and 5Mbps upload. The upload speed is what we are trying to control. I’ve found that 70% works: 5Mbps X 7% = 3.5Mbps. Note that you cannot enter fractional speeds so you’ll need to enter 3500Kbps. The download speed may not be important but you might want to throttle as well. Leave the Packets Dropped and Delays as 0 since those settings simulate errors.

Network Link Conditioner Settings

Network Link Conditioner

Restarting the computer turns off Network Link Conditioner. If it’s icon is missing from the menubar, it is off.

WARNING: Watch out for Apple Photos uploading again!

A number of things can cause the network issue to occur, not just the initial upload. If your internet connection exhibits the problem, it will happen every time Apple Photos needs to upload photos.

Here’s a short list of times when Apple Photos will upload photos and may affect your network:

  1. The first time you convert to Apple Photos.
  2. Any time you add new photos.
  3. If you rebuild the Photos library. In this case, a substantial number of photos will be updated. This can be almost as bad as starting from scratch and can take days for a large library.
  4. If you restore the Photos library from a backup. As with #3, a substantial portion of your library may be updated and it can take days.

Bottom line: Any time you make a change to the Photos library, you may need to enable Network Link Conditioner to prevent your internet connection from shutting down.

Disable Mac Guest User

The Guest User account on a Mac allows access to the Mac that might be unwanted. Follow these steps to disable Guest Access. Note that you must be logged in as an administrator or be able to authenticate as an administrator.

1. Choose System Preferences… from the Apple menu.

Apple Menu System Preferences


2. Click the Users & Groups icon.

Users & Groups Icon

3. If the lock in the lower-left corner is locked, click the lock to be able to make changes.Closed Lock Icon

After clicking the lock, you will need to authenticate with an administrator’s username and password.System Preferences Authentication

4. In the list of users, click Guest User.

Users & Groups - Guest User


5. Uncheck “Allow guests to log in to this computer”Uncheck Allow Guests

6. Click the Show All button to save your changes.

7. Click the Users & Groups icon to confirm that the changes were saved.

Note that I have noticed the Guest User account become enabled without making changes to Users & Groups. This might be a bug in OS X.

Test SSL Servers and Disable Anonymous Cipher Suites

This is a good site to test your server’s SSL configuration:

Qualys SSL Labs – SSL Server Test

If your server fails, there’s a good chance it is because of this error:

This server supports anonymous (insecure) suites.
TLS_ECDH_anon_WITH_RC4_128_SHA (0xc016)   INSECURE

If you are using cPanel, to fix the issue:

  1. Go to Apache Configuration then click Global Configuration. 
  2. In the SSL Cipher Suite area, click the last radio button so that you can enter a custom configuration.
  3. Enter the following:
    ALL:!ADH:RC4+RSA:+HIGH:+MEDIUM:-LOW:-SSLv2:-EXP:!kEDH:!aNULL

cPanel Apache SSL Cipher Suite Configuration

The last argument, !aNULL, disables the anonymous suites.

Mac Messages – Add Account and Share Screen

Mac Messages, previously called iChat, allows remote management of a Mac. These instructions were written for Messages. The steps for iChat may be slightly different.

Configure Messages

1. Open Messages.

2. From the Messages menu, choose Add Account…

Mac Messages Add Account menu item

3. In the Add Account dialog, click “Other messages account…” and then the Continue button.

Mac Messages Choose Account Type dialog

4. In the Add a Messages Account dialog, use the following settings and then click the Create button.

  • Account Type: AIM
  • Username: Enter your AIM/AOL username. This is often your email address. Or create an AIM account.
  • Password: The password for the username.

Mac Messages AIM Account Settings

5. After you are logged in, make sure that Messages is available by choosing Available from the My Status menu item under the Messages menu.

Mac Messages Available Status Menu Item

Start Screen Sharing

Once your computer is Available, your screen buddy (usually Will) will send a request to share the computer’s screen.

Messages will display a window asking you to confirm the request and will ring a chime. If you do not see the window, from the Window menu, choose Screen Sharing.

Mac Messages Screen Sharing Menu Item

The screen sharing dialog:

Mac Messages Screen Sharing Window

Click the Accept button and your buddy can now see and control your computer.